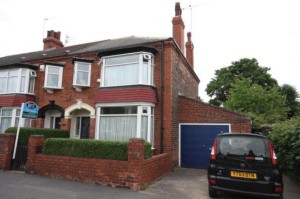
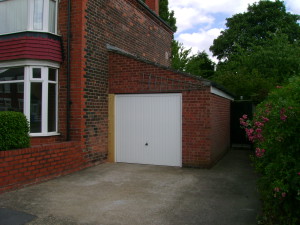
We have a large, flat, end of terrace wall that seems ideal for External Wall Insulation (EWI). It’s interrupted only by the garage. It’s a shame to cover the red brick, but we can go thicker than on the inside, plus there are chimney breasts on the inside of this wall which would be faffy indeed to insulate around.
We could go for a natural EWI system (woodfibre boards + lime render) like we did for the Internal Wall Insulation (IWI), but that requires better weather protection and so requires extending the roof slightly. Extending a gable end isn’t too bad, but with our hip roof it would be tricky and look odd – and besides, a natural system is far more expensive. So we compromised with natural, breathable IWI front and rear, and cheaper, synthetic but more insulating EWI on the side wall.
External Wall Insulation
-
Product Expanded polystyrene (EPS) board + render Rating λ=0.032, 140mm thick U-Value from 1.85 to 0.20 – 90% improvement Cost £5,000 less a 75% Green Deal grant = £1,250 Supplier Hall Renewables
Preparation
There are no down pipes or anything on this wall that would need moving, so that makes things a whole lot simpler. The only snag is that the garage door goes right up to the wall we are insulating. Same with the personnel door at the rear of the garage.


Planning permission is required when you change the appearance. I did the application myself (an installer could take care of it for you) and it was granted no problem, but it cost £172.
The EWI will be about 150mm thick, and achieve a low U-value of 0.20, a 90% improvement.
EWI is rather expensive, so grants are often available to help. I’ll spare you the saga, but it took a couple of years of perseverance and a bit of luck to finally to secure a 75% grant from the Green Deal Home Improvement Fund. Don’t get too excited though, the government announced in summer 2015 it’s closing down the Green Deal and not replacing it.
Installation


Conclusion
The street is a jumble of house ages and designs, with some buildings partially rendered or painted. Although a shame to cover the old brick, it was shockingly inefficient; we think the finish looks great and well worth it for the benefit it will bring. The shade of yellow (called limestone) echoes the roof edge tiles, and the yellow brick of the houses opposite.
We deliberately set the front edge back slightly to preserve the front brick corner. (There is still plenty of overlap with the IWI on the inside).
How much difference will it make? Well the heat pump not only runs for less time, but also runs more efficiently, as the radiators don’t need to get as hot to heat the house. When we light the stove, the surrounding bricks are still warm to the touch the following morning; previously that heat leaked straight through the wall in to the garage. On cold, bright days when sun streams in through the windows the rooms warm up – and stay warm.
So the results of the first winter are in. Last winter was significantly colder than the one before, but we actually used less electricity – so the EWI clearly works. By a rough degree day calculation I reckon that in our case we’re saving a further £80 a year.
